


Guides - Deploying a Minecraft Server through the Linode Marketplace
Quickly deploy a Compute Instance with many various software applications pre-installed and ready to use.
With over 100 million users around the world, Minecraft is the most popular online game of all time. You and other players are free to build and explore in a 3D generated world made up of millions of mineable blocks. Collect resources by leveling mountains, taming forests, and venturing out to sea. Choose a home from the varied list of biomes like ice worlds, flower plains, and jungles. Build ancient castles or modern mega cities, and fill them with redstone circuit contraptions and villagers. Fight off nightly invasions of Skeletons, Zombies, and explosive Creepers, or adventure to the End and the Nether to summon the fabled End Dragon and the chaotic Wither. If that is not enough, Minecraft is also highly moddable and customizable. You decide the rules when hosting your own Minecraft server for you and your friends to play together in this highly addictive game.
Deploying a Marketplace App
The Linode Marketplace allows you to easily deploy software on a Compute Instance using the Cloud Manager. See Get Started with Marketplace Apps for complete steps.
Log in to the Cloud Manager and select the Marketplace link from the left navigation menu. This displays the Linode Create page with the Marketplace tab pre-selected.
Under the Select App section, select the app you would like to deploy.
Complete the form by following the steps and advice within the Creating a Compute Instance guide. Depending on the Marketplace App you selected, there may be additional configuration options available. See the Configuration Options section below for compatible distributions, recommended plans, and any additional configuration options available for this Marketplace App.
Click the Create Linode button. Once the Compute Instance has been provisioned and has fully powered on, wait for the software installation to complete. If the instance is powered off or restarted before this time, the software installation will likely fail.
To verify that the app has been fully installed, see Get Started with Marketplace Apps > Verify Installation. Once installed, follow the instructions within the Getting Started After Deployment section to access the application and start using it.
NoteEstimated deployment time: Minecraft should be fully installed within 5-10 minutes after the Compute Instance has finished provisioning.
Configuration Options
- Supported distributions: Ubuntu 20.04 LTS
- Recommended plan: The plan size should be based on the amount of traffic you expect to see on your server. We recommend 2GB of RAM for every 15 players. For example, if you are expecting a small group of players (between 1-15), the 2GB plan should suffice. Up to 30 players, a 4GB instance would be a better fit.
Minecraft Options
- The username for the Linode’s admin/SSH user (required): This is the limited user account to be created for the Linode. This account has sudo user privileges. Only use lowercase characters. This username does not (and, for security reasons, likely should not) be the same as your Mojang or Microsoft account.
- The password for the Linode’s admin/SSH user (required): Set a password for the limited sudo user. The password must meet the complexity strength validation requirements for a strong password. This password can be used to perform any action on your server, similar to root, so make it long, complex, and unique.
- World Name: The world name and it’s corresponding file name. Advanced Configuration.
- Message of the Day: Text that is displayed whenever a player logs on to the server. Advanced Configuration.
- Flight Enabled: Allows flight if there is a mod installed that supports flying. This configuration has no effect on creative mode flight. Advanced Configuration.
- Nether World Enabled: Enables the Nether world. Advanced Configuration.
- Player Achievements Enabled: Whenever a player unlocks an achievement, it is broadcast to all logged in players. Advanced Configuration.
- Maximum Players: Maximum amount of players allowed on the server. Advanced Configuration.
- Player Idle Timeout Limit: If not set to disabled, the amount of time in minutes a player can be idle before being kicked off of the server. Advanced Configuration.
- Difficulty Level: The game difficulty. Advanced Configuration.
- Hardcore Mode Enabled: If set to
true, the difficulty is set to Hard. Additionally, on death the player doesn’t respawn and is be limited to spectator mode. Advanced Configuration. - PvP Enabled: Enables player versus player combat on the server. Advanced Configuration.
- Force Game Mode Enabled: Forces players to join the server’s default game mode.
falseallows players to join with their previous game mode.trueforces the default game mode. - World Type: Type of world to generate. Default = standard, flat = featureless and flat, largebiomes = larger biomes, amplified = larger height limit. Advanced Configuration.
- World Seed: A random value used by Minecraft’s world generation algorithm to create a unique world. For example:
qazwsx123. See Minecraft’s Gamepedia entry on seeds for more information. Advanced Configuration. - Spawn Animals Enabled: Determines if animals (sheep, chickens, squid, etc.) spawn. Advanced Configuration.
- Spawn Monsters Enabled: Determines if monsters (creepers, skeletons, spiders, etc.) spawn. Advanced Configuration.
- Spawn NPCs Enabled: Determines if villagers spawn. Advanced Configuration.
- Game Mode: The game mode of the server. Survival is the default game mode, creative allows for flight and unlimited resources, adventure prevents players from destroying blocks, and spectator grants the ability to fly, but prevents any player interaction on the server. Advanced Configuration.
- Structure Generation Enabled: Enables the ability to generate structures like villages and mineshafts. Advanced Configuration.
- Maximum Build Height: Maximum height at which players can place blocks. World generation may exceed this limit. Advanced Configuration.
- Maximum World Size: Maximum radius of the world, in blocks. Advanced Configuration.
- View Distance: The distance a player can see, measured in chunks (16 block cubes). For example,
10enables the user to see 10 chunks in any direction. - Command Block Enabled: Enables the placement of command blocks through the
/givecommand. Advanced Configuration. - Querying Enabled: Enables GameSpy4. Used to obtain information about the server. Advanced Configuration.
- Enable RCON: Enable remote access (RCON) to the Minecraft server to run commands. Advanced Configuration.
- RCON Password: The RCON password. Advanced Configuration.
- RCON Port: The port used for RCON. Advanced Configuration.
- Maximum Tick Time: The maximum amount of milliseconds a single tick can take before the server considers itself frozen or crashed and shuts down. Advanced Configuration.
- Network Compression Threshold: The threshold at which bytes are compressed. Advanced Configuration.
- Op-permission Level: Sets the permission level for operators (ops) when using the
/opcommand. Advanced Configuration. - Port Number: The server’s listening port number. Advanced Configuration.
- Snooper Enabled: Determines if the server sends stats to https://snoop.minecraft.net. Advanced Configuration.
- Use Native Transport Enabled: Improve server performance by optimizing sent and received packets. Advanced Configuration.
- SSH public key for the limited user: If you wish to login as the limited user through public key authentication (without entering a password), enter your public key here. See Creating an SSH Key Pair and Configuring Public Key Authentication on a Server for instructions on generating a key pair.
- Disable root access over SSH: To block the root user from logging in over SSH, select Yes (recommended). You can still switch to the root user once logged in and you can also log in as root through Lish.
Getting Started after Deployment
Ensure that you have installed Minecraft on your personal computer and created a Minecraft user account before getting started with this section.
After Minecraft has finished installing on your Linode, you are able to access your Minecraft server by copying your Linode’s IPv4 address and entering it in the Multiplayer menu on your personal computer’s Minecraft installation. To find your Linode’s IPv4 address:
Click on the Linodes link in the sidebar. You see a list of all your Linodes.
Find the Linode you just created when deploying your app and select it.
Navigate to the Networking tab.
Under the IPv4 heading, your IPv4 address are listed under the Address column. Copy your IPv4 address.
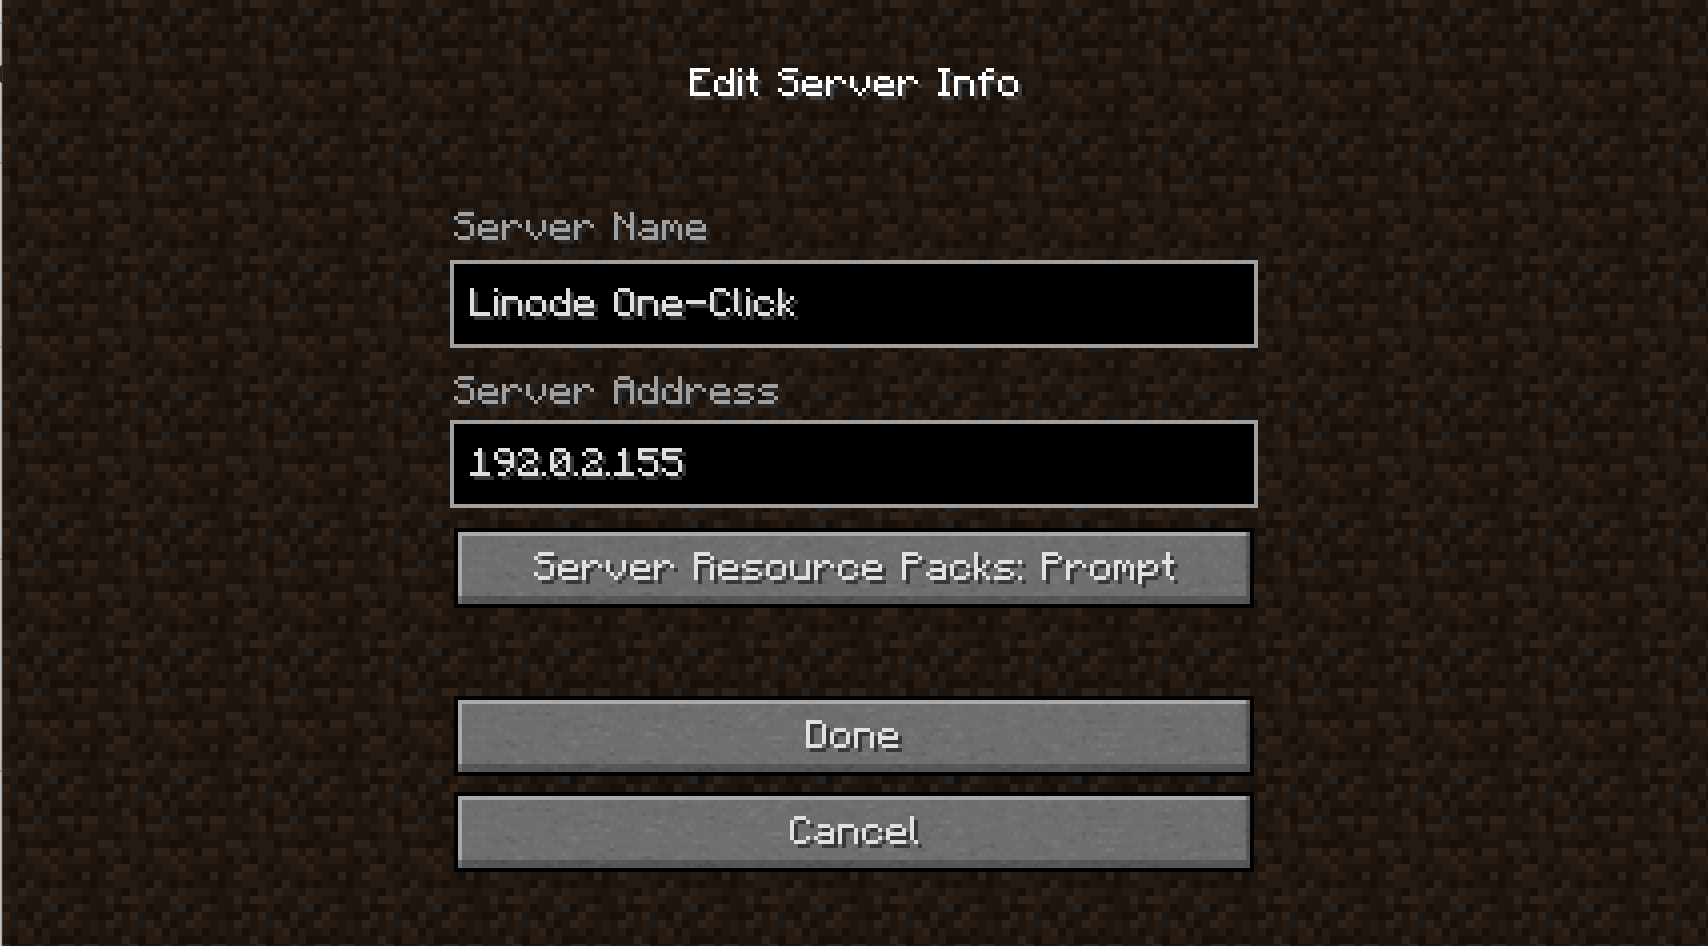
Open Minecraft on your computer and click on Multiplayer, then click Add Server.
Enter a name for your server in the Server Name box. This name is displayed on the Play Multiplayer server selection screen.
Paste your IP address in the Server Address field and click Done:


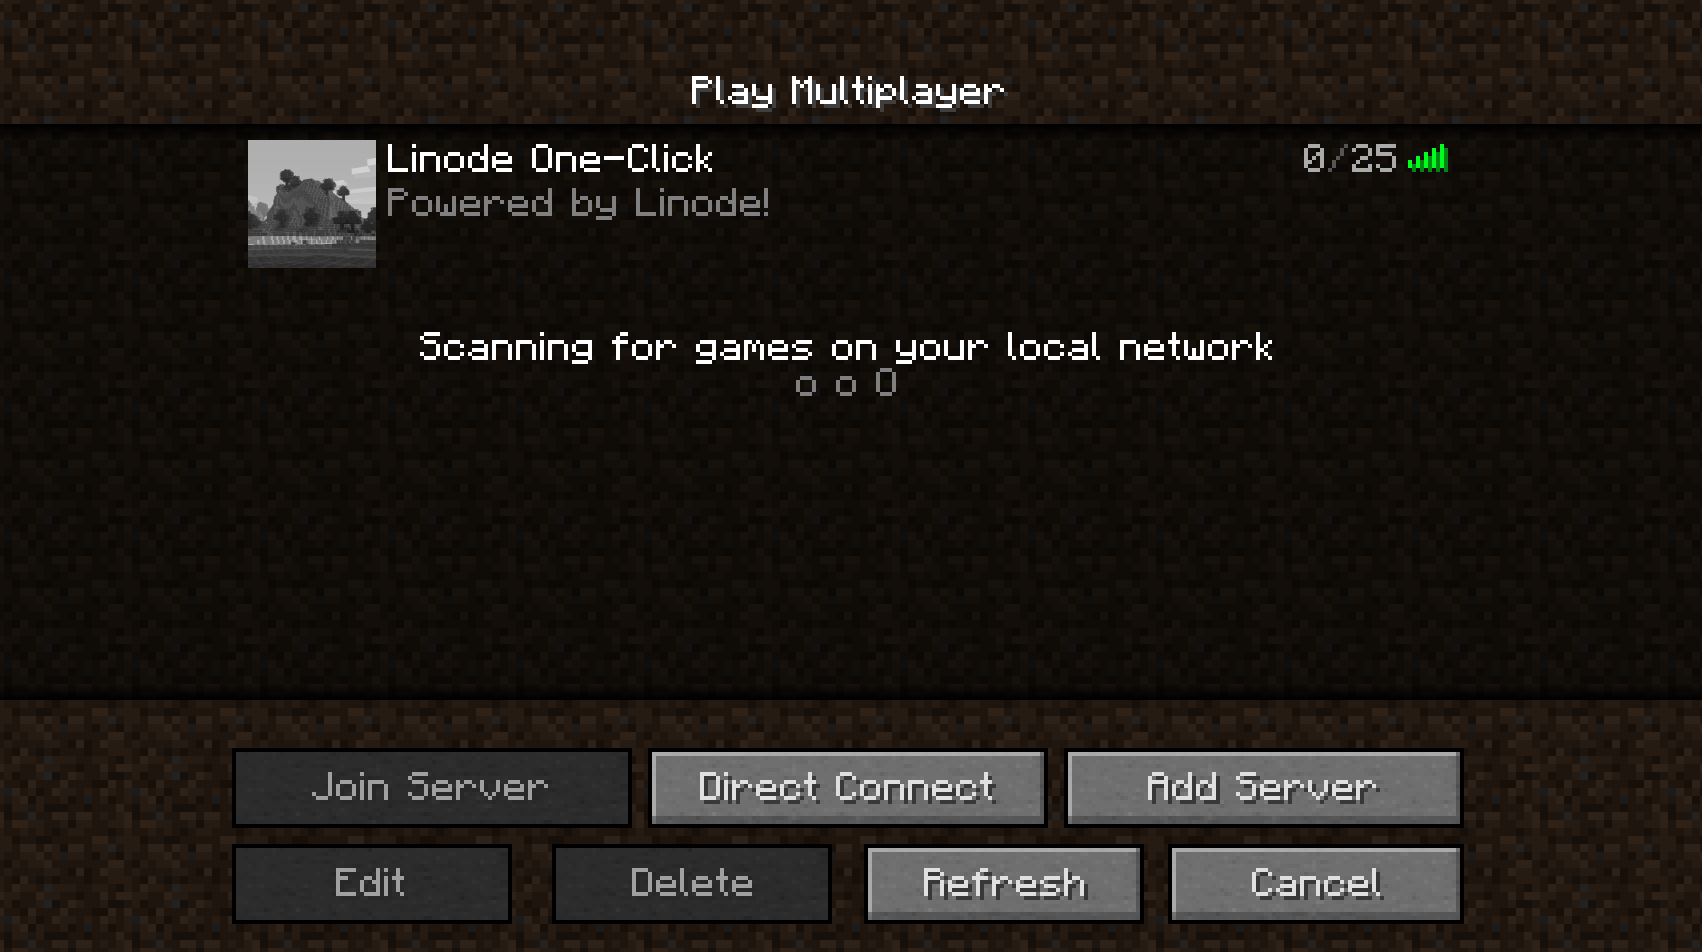
Once your server is ready to play on, the status indicator shows a series of green bars.


If there is a red X over the status bars, or it says old, then your Linode has not finished installing Minecraft. Wait a few minutes, then hit Refresh.
Customization After Installation
After installation you can change your Minecraft options by customizing the system configuration files.
Customize the Minecraft Service
The system service file is located in your home directory:
~/etc/systemd/system/mcserver.service. You can update this file to optimize your server’s performance.Customize the Minecraft World Options
The files to configure the world options are also located in your home directory:
~/serverfiles. Here you findserver.properties,banned-ips.json, and more. The name of the world you created during installation has a folder here as well. Inside this folder are other configuration files for that specific world.
Software Included
The Minecraft Marketplace App installs the following software on your Linode:
| Software | Description |
|---|---|
| Minecraft 1.17 | Game server. |
| LinuxGSM | A command line tool for the deployment and management of Linux game servers. |
| UFW | Firewall utility. Port 25575 allows outgoing and incoming traffic. |
| Fail2ban | Fail2Ban is an intrusion prevention software framework that protects computer servers from brute-force attacks. |
NoteCurrently, Linode does not manage software and systems updates for Marketplace Apps. It is up to the user to perform routine maintenance on software deployed in this fashion.
More Information
You may wish to consult the following resources for additional information on this topic. While these are provided in the hope that they will be useful, please note that we cannot vouch for the accuracy or timeliness of externally hosted materials.
This page was originally published on
All rights reserved.