How to Install NeoVim and Plugins with vim-plug


What is NeoVim?
If you are a system administrator or a software developer, a robust text editor is among the tools you use on a daily basis. It’s likely that you’ve used the vi or vim editors that have served the Unix and Linux communities for decades.
Although vim is under active development, it includes some ~300k lines of C89 code. In addition to being difficult to maintain, issues and new pull requests cannot be addressed very easily since Bram Moolenaar is the only person who maintains the large codebase of the program.
These difficulties, along with the lack of support for some desired features such as asynchronous plugins, motivated the birth of NeoVim as a fork of vim. The project’s main objective is to completely refactor vim so that maintenance can be simplified, and new features and bug fixes can be quickly added to the source code.
What To Expect From NeoVim?
During NeoVim’s short life, two outstanding features have already been implemented: asynchronous plugins, and the Remote Procedure Call (RPC) API for controlling NeoVim programmatically.
Asynchronous plugins make it possible for plugins to run as background processes without interfering with the main editor process.
The RPC API allows GUI programs (and other software that speaks the msgpack-rpc messaging protocol) to connect to a running NeoVim instance. This means that you can integrate well-known text editors such as Atom, Visual Studio Code, or Sublime Text with NeoVim and have modifications sync bidirectionally between them. That way, you can leverage all the features of the GUI program while using nvim’s engine behind the scenes.
This guide details the installation and configuration of NeoVim, along with two asynchronous plugins, nvim-completion-manager and far.vim.
Before You Begin
If you have not already done so, create a Linode account and Compute Instance. See our Getting Started with Linode and Creating a Compute Instance guides.
Follow our Setting Up and Securing a Compute Instance guide to update your system. You may also wish to set the timezone, configure your hostname, create a limited user account, and harden SSH access.
Install the necessary tools:
In CentOS and similar distributions, enable the Extra Packages (EPEL) repository, then install the packages:
 sudo yum install epel-release -y
 sudo yum install wget fuse fuse-libs git ack python34-pip -y
In Debian, Ubuntu, and their derivatives:
sudo apt-get install fuse libfuse2 git python3-pip ack-grep -y
In this tutorial we install NeoVim by downloading an appimage, a binary file that contains the application and its dependencies (with the exception of the FUSE libraries, which need to be installed separately). This method is distribution-agnostic and provides the latest version of the package.
Note that the NeoVim appimage is currently only available for 64-bit systems. If you are using a different architecture, or would like to see if NeoVim is available from your distribution’s repositories, you may refer to the installation instructions in the NeoVim wiki.
While FUSE libraries make it possible for the appimage to be run by non-root users even from their home directories, we make the program available for all users by placing it inside /usr/bin. This will allow users to utilize the same application but configure it to meet their specific needs.
Install the NeoVim Appimage
Download and install the appimage, use the
output-documentoption to rename it tonvim:wget --quiet https://github.com/neovim/neovim/releases/download/nightly/nvim.appimage --output-document nvimSet the owner to
root, and make nvim accessible to all users:chmod +x nvim sudo chown root:root nvimMove the binary file to
/usr/bin:sudo mv nvim /usr/binMove into your home directory and create the subfolder structure to store the configuration file:
cd ~
mkdir -p .config/nvim
Install the Vim-plug Plugin Manager
To make it easier to install plugins, use the Vim-plug plugin manager. This plugin manager uses git to manage most plugins:
curl -fLo ~/.local/share/nvim/site/autoload/plug.vim --create-dirs https://raw.githubusercontent.com/junegunn/vim-plug/master/plug.vim
(Optional) Import Existing vim Configuration
If you already have a vim configuration you enjoy, reutilize it for nvim. While vim and nvim can share the same configuration file, create a separate one for nvim to prevent errors if you don’t have Vim-plug also configured for vim:
ln -s ~/.vimrc ~/.config/nvim/init.vim
Or create a separate one beginning with the current contents of ~/.vimrc:
cp ~/.vimrc ~/.config/nvim/init.vim
Run NeoVim
Launch nvim:
nvim
To exit without saving changes, press the ESC key to enter Command mode, then:
:q!
Install NeoVim Plugins
Nvim-completion-manager Plugin
nvim-completion-manager is a fast, extensible completion framework that supports a variety of programming languages and snippet solutions. Some of these are supported out of the box, while others require the installation of extra Python 3 modules to work. In this guide we illustrate the use of this plugin with UltiSnips, a robust snippet solution.
Install the NeoVim Python module:
pip3 install --user neovimAdd the following lines at the bottom of your
~/.config/nvim/init.vimfile to include the snippets available through UltiSnips and vim-snippets:- File: ~/.config/nvim/init.vim
1
2
3
4
5
call plug#begin() Plug 'roxma/nvim-completion-manager' Plug 'SirVer/ultisnips' Plug 'honza/vim-snippets' call plug#end()
Launch nvim, execute
PlugInstall, update the plugins, and exit:nvim :PlugInstall :UpdateRemotePlugins :q! :q!The plugin will be ready for use after you restart nvim. To test it, create a
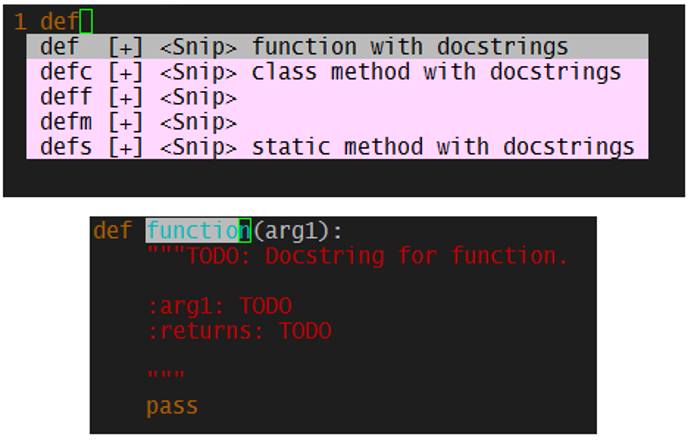
.pyfile namedhelloworld.pyas follows:nvim helloworld.pyPress i to enter Insert mode, and type
def. You should be presented with a dropdown list similar to that shown in the image below. Highlight one of the options using the up and down arrows in your keyboard and press the Tab key. The code snippet will be inserted into the body of the file:
For more examples using other programming languages, refer to the plugin documentation.
Far.vim Plugin
far-vim is a plugin for performing asynchronous search and replace operations on a set of files (typically within the same directory).
Insert the following line before
call plug#end()in~/.config/nvim/init.vim:- File: ~/.config/nvim/init.vim
1Plug 'brooth/far.vim'
Open nvim and execute
PlugInstall, update the plugins, and exit. The plugin will be available when you restart nvim:nvim :PlugInstall :UpdateRemotePlugins :q! :q!To test
Far.vim, create a directory namedmyprojectand create two files within the directory:mkdir myproject cd myproject- File: myproject/greeting.py
1
2
def greet(name): print('Hello', name)
and
- File: myproject/persons.py
1
2
3
4
5
6
7
#!/usr/bin/python3 from greeting import greet # Import the greet function from greeting.py # Pass a name to greet() greet('Jack') greet('Jill') greet('Bob')
Open either file with nvim and use Command mode:
:Far name nombre .py$ --source=acknvimThe nvim window will split into two panes. The left one shows the file and the one in the right shows the results if the changes are applied in all the
.pyfiles inside the current directory. Apply the changes withFardo(still in Command mode)::FardoTo undo the changes:
:Farundo
Neomake - An Alternative to make
You may also want to take a look at neomake, a plugin similar to syntastic in vim. Where syntastic may freeze vim while it checks the syntax of a large file every time you save changes, neomake can perform the same function without causing any interruptions.
Roadmap and Future
There are more than 300 developers contributing to NeoVim in GitHub and it is expected that the project will grow at a faster pace than it has done in the past. Visit the official GitHub to view milestones and a roadmap for the next version.
More Information
You may wish to consult the following resources for additional information on this topic. While these are provided in the hope that they will be useful, please note that we cannot vouch for the accuracy or timeliness of externally hosted materials.
This page was originally published on


