Installing and Using NGINX on Ubuntu 20.04
NGINX (pronounced “engine-X”) is an open-source web server that excels at load balancing, caching, and acting as a reverse proxy. NGINX was developed with efficiency and concurrency in mind, seeking to address the scalability and performance issues in other popular web servers. Its event-driven architecture continues to set it apart as one of the highest-performing web servers available. This guide aims to show you how to install NGINX on your Ubuntu 20.04 server and how to get started using it.
Before You Begin
If you have not already done so, create a Linode account and Compute Instance. See our Getting Started with Linode and Creating a Compute Instance guides.
Follow our Setting Up and Securing a Compute Instance guide to update your system. You may also wish to set the timezone, configure your hostname, create a limited user account, and harden SSH access.
NoteThis guide is written for non-root users. Commands that require elevated privileges are prefixed withsudo. If you are not familiar with thesudocommand, see the Linux Users and Groups guide.
Install NGINX
Install NGINX from the package manager.
sudo apt install nginxThe NGINX service starts running immediately. You can verify its status with the following command:
sudo systemctl status nginxThe NGINX service is also enabled by default, meaning that it begins running automatically at system startup.
Open port 80 on your system’s firewall. UFW is the frontend typically used to manage firewall rules on Ubuntu. You can use the example commands to open port 80 with
ufwand reload the rules so they take effect.sudo ufw allow http sudo ufw reloadRefer to our How to Configure a Firewall with UFW guide for more on how to use UFW for managing your firewall.
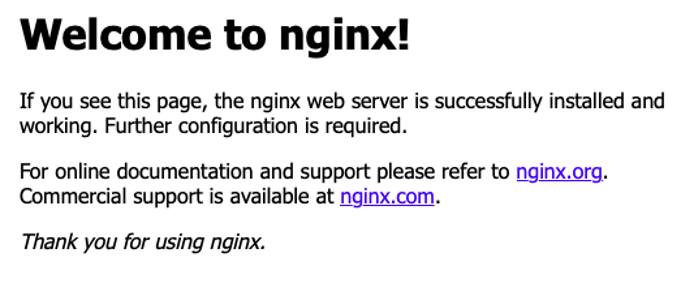
Visit the default NGINX page to see your installation in action. You can find it by navigating to your server’s domain name or its IP address.
For example, if your domain name is
example.com, navigate tohttp://example.com; if your IP address is192.0.2.0, you can instead navigate tohttp://192.0.2.0.
Manage NGINX
The NGINX service runs on systemd, which means you can manage it using systemctl commands.
View the current status of the NGINX service using the command below:
sudo systemctl status nginxStop the NGINX service with the following command:
sudo systemctl stop nginxYou can then start the NGINX service back up using the following command:
sudo systemctl start nginxTo disable the NGINX service, preventing it from beginning automatically at system startup, execute the following:
sudo systemctl disable nginxYou can enable the NGINX service again using:
sudo systemctl enable nginxRestart the NGINX service using the command below:
sudo systemctl restart nginxTo reload NGINX’s configuration files, you an use the following command:
sudo systemctl reload nginx
Use NGINX
This section walks you through setting up your own website using NGINX. In doing so, it also illustrates how to set up an NGINX proxy to serve static content.
NGINX Configuration
Disable the default NGINX configuration file.
sudo unlink /etc/nginx/sites-enabled/defaultCreate an NGINX configuration file for your site.
In this example, replace
example.comwith your site’s domain, in both the filename, and in the file’s contents. Do the same whenever you seeexample.comfrom here on.- File: /etc/nginx/sites-available/example.com
 1
 2
 3
 4
 5
 6
 7
 8
 9
10
11
12
13
server { listen 80; listen [::]:80; server_name example.com; root /var/www/example.com; index index.html; location / { try_files $uri $uri/ =404; } }
This configuration creates a new NGINX server. That server listens for requests on port 80 for the domain name
example.com. It then defines the server’s root directory and index file name. The root directory is where NGINX maps requests to files, and the index file name is the name of the file NGINX serves for a request to the root directory.So, for a request to
example.com/, NGINX attempts to locate anindex.htmlfile in the/var/www/example.comdirectory and serves the file if it finds it there.Enable your NGINX site.
sudo ln -s /etc/nginx/sites-available/example.com /etc/nginx/sites-enabled/Run NGINX’s configuration test to verify your configuration file.
sudo nginx -tRestart NGINX for the changes to take effect.
sudo systemctl restart nginx
Launch the Site
Create a directory for your NGINX site’s content.
sudo mkdir /var/www/example.comCreate an
index.htmlpage in the new NGINX site directory.- File: /var/www/example.com/index.html
1
2
3
4
5
6
7
8
<!doctype html> <html> <body> <h1>Hello, World!</h1> <p>This is an example website running on NGINX.</p> </body> </html>
In a browser, visit the domain you set up for your website.
You should see your website’s “Hello, World!” page.

Conclusion
To learn more about NGINX’s features and capabilities, check out our A Comparison of the NGINX and Apache Web Servers guide.
For more advanced configuration options, including security and performance optimizations and TLS setup, see our four-part series on NGINX.
- Part 1: Installation and Basic Setup
- Part 2: (Slightly More) Advanced Configurations
- Part 3: Enable TLS for HTTPS Connections
- Part 4: TLS Deployment Best Practices
More Information
You may wish to consult the following resources for additional information on this topic. While these are provided in the hope that they will be useful, please note that we cannot vouch for the accuracy or timeliness of externally hosted materials.
This page was originally published on


