Host Your Own RSS Reader with Tiny Tiny RSS on CentOS 7
Tiny Tiny RSS (or tt-rss for short) is an open-source, self-hosted RSS reader that runs on PHP and a traditional SQL database. Running your own RSS aggregator puts you in control of your data, and Tiny Tiny RSS even supports mobile apps that connect to your server.


This guide will walk through the steps necessary to install and configure Tiny Tiny RSS on a Linode running CentOS 7, using MariaDB as the database and Apache as the web server.
Before You Begin
Familiarize yourself with our Getting Started guide and complete the steps for setting your Linode’s hostname and timezone.
Follow the steps in the LAMP on CentOS 7 guide.
Make sure your system is up to date:
sudo yum update
Preparing MySQL
Connect to your MariaDB database as the root user:
mysql -u root -pFrom the MariaDB shell, issue the following commands to create a new database and user for Tiny Tiny RSS. Replace MyPassword with a strong password:
create database ttrss;
grant all on ttrss.* to 'ttrss' identified by 'MyPassword';
exit
Preparing Apache
Ensure that necessary PHP prerequisites are installed:
sudo yum install -y php-mysql php-mbstring php-intlAdd a configuration file under
/etc/httpd/conf.d/ttrss.confto secure the directories that Tiny Tiny RSS will use:- File: /etc/httpd/conf.d/ttrss.conf
1
2
3
4
5
6
7
8
9
<Directory /var/www/html/cache> Require all denied </Directory> <Directory /var/www/html> <Files "config.php"> Require all denied </Files> </Directory>
Restart Apache to apply your changes:
sudo systemctl restart httpd
Install Tiny Tiny RSS
The recommended installation method for Tiny Tiny RSS is to clone the repository with git, as this simplifies the update process.
Install
git:sudo yum install -y gitClone the codebase into
/var/www/html:sudo git clone https://tt-rss.org/git/tt-rss.git /var/www/htmlNote
This command will clone tt-rss into the
/var/www/htmldirectory at the root, which means you will access the application at the root URL of your webserver (for example, at http://myserver). If you would prefer to use Tiny Tiny RSS under a separate URL (for example, at http://myserver/tt-rss), you can change the directory indicated in thegit clonecommand to/var/www/html/tt-rss.If you decide to use a different location, note that you’ll need to replace instances of
/var/www/htmlin your Apachettrss.conffile with the directory of your choosing.Restart Apache to ensure that your changes have been applied:
sudo systemctl restart httpd
Configure Tiny Tiny RSS
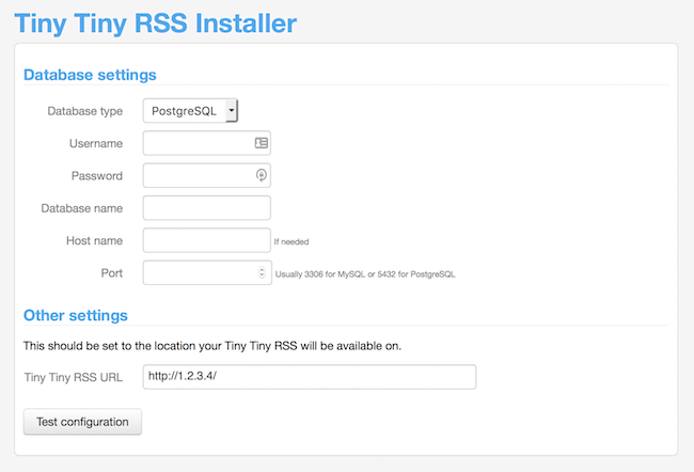
At this point the application should be accessible under Apache. As an example, if your Linode had the IP address of 1.2.3.4, browsing to http://1.2.3.4 should result in the following screen:

Fill in the fields with the appropriate information:
- From the Database type dropdown, choose
MySQL. - Under Username, fill in
ttrss. - Under Password, fill in the password chosen when setting up the ttrss database in MariaDB/MySQL.
- Use
ttrssas the Database name. - The Host name and Port fields can be left blank.
- The Tiny Tiny RSS URL section should automatically populate with the correct IP address for your Linode. If you are accessing your Linode via a DNS name instead of an IP address, be sure update the field to reflect this.
- From the Database type dropdown, choose
After filling in the fields, click Test configuration to perform a preliminary check of your setup. If everything is ready, click the Initialize database button.
Note
Initializing the database will wipe all data in thettrssdatabase. If you are installing over a previous installation, perform any backups as necessary.After the application initializes the MariaDB database, a message should appear warning you that TinyRSS cannot update
config.phpbecause the parent directory is not writeable. This is a good thing because any potential vulnerabilities in the web application cannot write files to disk. In order to finish configuring the application, follow the instructions to copy the full contents of the text box beginning with<?php, and paste them into/var/www/html/config.php.The following snippet shows what the first few lines of the file should look like:
- File: /var/www/html/config.php
1 2 3 4 5 6 7<?php // ******************************************* // *** Database configuration (important!) *** // ******************************************* define('DB_TYPE', 'mysql'); ............
If you need to customize your Tiny Tiny RSS configuration further (for example, if you have an SMTP server that you wish to use in conjunction with Tiny Tiny RSS to email you with feed news), you should do so by editing
config.phpnow.Before using Tiny Tiny RSS, a few directory permissions must be changed so that Apache can write to them. The following commands will change only the necessary directories that require additional permissions:
cd /var/www/html
sudo chgrp -R apache cache lock feed-icons
sudo chmod -R g+w cache lock feed-icons
This command must be used to permit Apache to write to these directories on CentOS 7 systems with SELinux enabled. If SELinux has been disabled (check the output of the
sestatuscommand if unsure), this step is not necessary:sudo chcon -R unconfined_u:object_r:httpd_sys_rw_content_t:s0 cache feed-icons lock
Feed Updates
Now that Tiny Tiny RSS is up and running, create a systemd unit to automate the updating of your RSS feed. Create a file under /etc/systemd/system/ttrss-updater.service and copy the following information into it:
- File: /etc/systemd/system/ttrss-updater.service
 1
 2
 3
 4
 5
 6
 7
 8
 9
10
[Unit] Description=ttrss_backend After=network.target mysql.service [Service] User=apache ExecStart=/var/www/html/update_daemon2.php [Install] WantedBy=multi-user.target
Start the service, and enable it to start at boot:
sudo systemctl enable --now ttrss-updater
Using the Application
Browse to the URL of your server, which should render the Tiny Tiny RSS login page:

Log in with the username
adminand default passwordpassword.Change the administrator password to something stronger by clicking the Actions button in the top-right corner of the Tiny Tiny RSS main page. Select Preferences, then click the Users tab that appears. Click on the
adminuser and you’ll see the following screen, with the option to change the user password:
Note that if you prefer to log in with a less privileged user, you can create additional users from the Users page, by clicking Create user.
At this point you can begin using Tiny Tiny RSS to subscribe to and read feeds. To get started, click on the Actions button (click Exit preferences if you are still in the preferences panel), and click the Subscribe to feed… link.
More Information
You may wish to consult the following resources for additional information on this topic. While these are provided in the hope that they will be useful, please note that we cannot vouch for the accuracy or timeliness of externally hosted materials.
This page was originally published on


